In the previousarticle, we saw how to validate an identification form. We also know how to save the token sent by the server if the connection succeeds. We are also able to manage different types of error messages, either at the level of each field (username and password) or when we receive a return that we don’t like from the server.
This time, we are going to protect some pages. Indeed, these must be visible only by the people who are connected. Hence the usefulness of our identification page.
Protecting involves 2 straightforward actions:
- If you try to access the protected page, you must be redirected to another page (in this case the identification page).
- If you are already logged in and go to the identification page, you can choose to display a message instead of the form or redirect the user to a page reserved for authenticated persons. We will opt for the second solution .
To describe the scenario :
- The person enters his or her username and password. ✔️ (cf article)
- Then, clicks on the login button ✔️ (cf article)
- Once logged in, the user is redirected to the home page . ✔️
- A toolbar appears. ✔️
- It is possible to click on a logout button to log out. ✔️
- A burger menu will display the other protected pages. ✔️
- A toolbar appears. ✔️
- We will refine the display by creating a custom theme for material.
- We will also add a css layer to our elements using tailwindcss
Redirection to the home page once logged in
this has already been discussed in the previous article . To summarize quickly, this redirection takes place in the onSubmit method of the LoginComponent -> /src/app/components/login/login.component.ts class, of which the following is an excerpt from the code
if (tokenExists) {
        this.router.navigate(['/']);
        return true;
}
If you receive a token from the server, you are considered authenticated.
We also have to do the reverse. If the user accesses the login page, being already authenticated, he must be redirected again to the page reserved for authenticated users. This has also always been addressed in the same class. And this time in the class constructor.
// redirect to home if already logged in
if (this.service.currentUserValue) {
    this.router.navigate(['/']);
}
💡 This raises the question: for all the pages to which we want to protect access, should a similar condition be added each time?
… It is feasible and it will work properly. But we can make it much simpler. For this, we will use the canActivate interface of the Angular Router.
canActivate
You have to add this property in the route definition – in the file /src/app/app-routing.module.ts
import { AuthGuard } from './providers/auth';
const routes: Routes = [
    {
        path: '',
        component: HomeComponent,
        canActivate: [AuthGuard]
    },
    {
      path: 'login',
      component: LoginComponent
    },
    {
      path: 'event',
      component: EventComponent,
      canActivate: [AuthGuard]
    },
    {
      path: 'lieux',
      component: LieuxComponent,
      canActivate: [AuthGuard]
    }
];
In the code snippet above, the following routes are protected: home, event, and locations. Only the login route is accessible to the anonymous user.
Let’s create the AuthGuard. class in /src/app/providers/auth.ts. Here is its content
import { Injectable } from '@angular/core';
import { Router, CanActivate, ActivatedRouteSnapshot, RouterStateSnapshot } from '@angular/router';

import { LoginService } from './login.service';

@Injectable({ providedIn: 'root' })
export class AuthGuard implements CanActivate {
  constructor(
    private router: Router,
    private loginService: LoginService
  ) {}

  canActivate(route: ActivatedRouteSnapshot, state: RouterStateSnapshot) {
    const currentUser = this.loginService.currentUserValue;
    if (currentUser) {
      // authorised so return true
      return true;
    }

    // not logged in so redirect to login page with the return url
    this.router.navigate(['/login'], { queryParams: { returnUrl: state.url }});
    return false;
  }
}
It is useful to inject the LoginService class into this AuthGard class. Indeed, this LoginService class allows us to know if a user is connected or not. Simply, the canActivater method returns true (line 15-17) if a user is logged in.
It’s also thanks to lines 20-23 of this AuthGard class that will redirect the user to the login page if he is not authenticated.
… Home page
This page looks like this
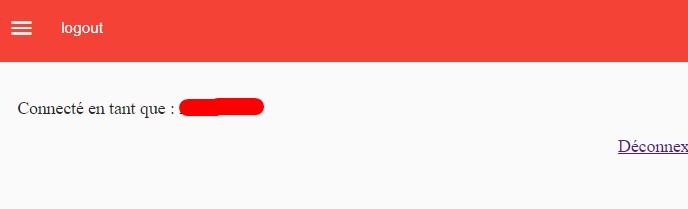
Our username is hidden behind the red block. By clicking on the logout button in the toolbar, we are logged out and redirected to the login page. This button is displayed in the html file /src/app/app.component.html as follows
<button id="button-logout" mat-button (click)="logout()">logout</button>The logout()method is defined in /src/app/app.component.ts
logout() {
    this.loginService.logout();
    this.router.navigate(['/login']);
}
Let’s see how to display this username.
This is done in the ngOnInit method of the class HomeComponent /src/app/components/home/home.component.ts. The complete code of this class is
import { Component, OnInit } from '@angular/core';
import { first } from 'rxjs/operators';

import { User } from '../../models/user';
import { UserService } from '../../providers/user.service';

@Component({
  selector: 'app-home',
  templateUrl: './home.component.html',
  styleUrls: ['./home.component.scss']
})
export class HomeComponent implements OnInit {

  loading = false;
  users: User[];
  me: User;

  constructor(
    private userService: UserService
  ) {}

  ngOnInit() {
    this.loading = true;

    this.userService.me().pipe(first()).subscribe(me => {
      this.loading = false;
      this.me = me;
    });
  }

}
We have already created the userService class but we don’t know what it contains ? /src/app/providers/user.service.ts
For the moment, it only contains a me() method that displays the authenticated user’s information.
Here is its content
import { Injectable } from '@angular/core';
import { HttpClient } from '@angular/common/http';

import { AppConfig } from '../../environments/environment';
import { User } from '../models/user';

@Injectable({
  providedIn: 'root'
})
export class UserService {

  constructor(private http: HttpClient) { }

  me() {
    console.log(`${AppConfig.apiUrl}/user/me`); // http://localhost:3008/api/user/me
    return this.http.get<User>(`${AppConfig.apiUrl}/user/me`);
  }
}
PAs a reminder, the me() method calls a nodejs-express application running on port 3008. The file /src/environments/environment.ts contains the following code :
export const AppConfig = {
  production: false,
  environment: 'LOCAL',
  apiUrl: 'http://localhost:3008/api'
};
In the html code of the file /src/app/components/home/home.component.html. We have this code :
<div class="m-8">
   <div *ngIf="me">
     <p>Connecté en tant que : <strong>{{ me.data.username }}</strong></p>
     <p class="text-center"><a routerLink="/login" [queryParams]="{logout: 1}" class="color--white">Déconnexion</a></p>
   </div>
 </div>
{{ me.data.username }}contains the username of the authenticated person.
💡 In the URL http://localhost:3008/api/user/me, no username or password is given. Moreover, if you refresh the page as many times as you want, the user logged in is always displayed correctly. What’s the magic behind this?
Well, that’s another feature… the interceptors…
Interceptors
It’s a way to intercept or modify the global http request of an application before triggering the url called by this request.
To implement it, we add in /src/app/app.module.ts
import { HTTP_INTERCEPTORS  } from '@angular/common/http';
import { Interceptor } from './providers/interceptors/interceptor';
import { ErrorInterceptor } from './providers/interceptors/errorinterceptor';
It contains the following code
@NgModule({
providers: [
    { provide: HTTP_INTERCEPTORS,  useClass: Interceptor, multi: true },
    { provide: HTTP_INTERCEPTORS,  useClass: ErrorInterceptor, multi: true }
  ],
  bootstrap: [AppComponent]
})
On peut ajouter autant d’interceptor qu’on veut. Nous allons créer 2 interceptors:
- Pour ajouter le token Bearer dans l’entete des pages avant d’activer une page protégée.
- Pour intercepter le code d’erreur . Cas d’une page 404 par exemple ou 401 (forbidden)
Interceptor Bearer
Créons le fichier /src/app/providers/interceptors/interceptor.ts
Il contient le code suivant
import { Injectable } from '@angular/core';

import {
  HttpRequest,
  HttpHandler,
  HttpEvent,
  HttpInterceptor
} from '@angular/common/http';

import { LoginService } from '../login.service';
import { Observable } from 'rxjs';

@Injectable()
export class Interceptor implements HttpInterceptor {

  constructor(private service: LoginService) {}

  intercept(request: HttpRequest<any>, next: HttpHandler): Observable<HttpEvent<any>> {
    // add authorization header with jwt token if available
    let currentUser = this.service.currentUserValue;
    if (currentUser && currentUser.token) {
      request = request.clone({
        setHeaders: {
          Authorization: `Bearer ${currentUser.token}`
        }
      });
    }

    return next.handle(request);
  }

}
This class also depends on the LoginService class that contains information about an authenticated user.
Thanks to this information, it is possible for us to retrieve the token of this user. And add this token to Authorization: Bearer in the header of each URL to protect. Here is what it looks like when inspecting the URL header
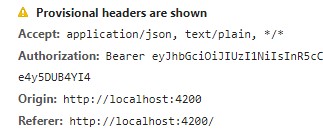
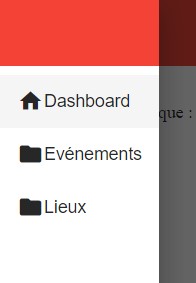
Burger menu on the left in the toolbar
Click on the burger

On afficher d’autres pages protégées .
Personalized theme
Creating a custom theme (or rather changing the colors of the indigo-pink.css theme) is very easy.
We will do this in a custom scss file that we will place in /src/assets/css/custom.scss
You have to add this file to the /src/styles.scss file by simply adding like this
@import './assets/css/custom';Then in /src/assets/css/custom.scss
@import '~@angular/material/theming';

@include mat-core();

$custom-primary: mat-palette($mat-red);
$custom-accent:  mat-palette($mat-pink);

$custom-theme: mat-light-theme($custom-primary, $custom-accent);

@include angular-material-theme($custom-theme);
The line
@include mat-core();is used to include styles common to material
The lines
$custom-primary: mat-palette($mat-red);
$custom-accent: mat-palette($mat-pink);
define the pallets for our Material theme.
Tailwindcss;
Tailwindcss is a css framework. It is different from other known frameworks such as Boostrap, bulma … The notable difference is in the way to proceed. With tailwindcss, we decide what we want to put in the css properties..
Let’s install this powerful library to take advantage of the formatting defined in the css properties.
npm install tailwindcss --save-devLet’s run the following command to create a config file useful to tailwindcss
npx tailwind initWe create a file /src/tailwindcss-build.scss and add the following
@tailwind components;
@tailwind utilities;
We compile the file /src/tailwind.scss which we will then call in Angular. The compilation is done with the following command :
npx tailwind build ./src/tailwind-build.scss -o ./src/tailwind.scssFrom there, we can import this file /src/tailwind.scss into /src/styles.scss like this
@import './tailwind';And we will use it for example in our /src/app/components/event/event.component.html page to add a margin to the
Like this
<div class="m-8">
    Event page
</div>
Where it plays an essential role is when it comes to reusing a multiple property to a tag.
Translated by Andy A.