Let’s get to the heart of our Angular/Electronjs application. Let’s create a login page in our web application.
This login page will communicate later with a nodejs backend developed by expressjs. This application is already functional. It uses the ORM sequelize to connect to a Mysql database.
This is an article detailing the implementation of this application.
For the general interface’s design, we could have chosen bootstrap. We will do better and follow the Angular standard;) We will then use Material Angular.
Several reasons lead us to this choice :
- Because Material Angular is developed by Angular, therefore it integrates easily into an application.
- Several composants are already there.
- We’ll need to add animations and a somewhat complex layout later. For this, there are two extensions which are the flex-layout and the CDK
To describe the scenario of our final application, we will have a login page without a toolbar which contains 2 text fields: username and password. A login button will be added, then handling error messages. When the user is authenticated correctly, the toolbar will be displayed with a simple menu.
Also, we ensure that the nodejs application is launched. Otherwise, we risk finding ourselves with incomprehensible surprises.
In the nodejs folder, launch the application.
cd nodejs
nodemon ./bin/www
The nodejs application runs by default on port 3000 while our angular application runs on port 4200 (in development mode).
But here, we will only display the login page.
Addition of Angular Material
In the angular folder, let’s install the useful packages
npm install --save @angular/material @angular/cdk @angular/animations hammerjs @fortawesome/fontawesome-free @angular/flex-layoutHere are the versions of these packages once installed
- @angular/material@8.0.1
- @angular/cdk@8.0.1
- @angular/animations@8.0.2
- hammerjs@2.0.8
- @fortawesome/fontawesome-free@5.9.0
- @angular/flex-layout@8.0.0-beta.26
We needed to install hammerjs because some components requiring the touch gesture functionality of Material depend on hammerjs.
We deliberately add font-awesome as well because we like these extra icons.
angular/flex-layout is useful when formatting elements.
Let’s modify the src/app/app.module.ts file and add
import {BrowserAnimationsModule} from '@angular/platform-browser/animations';Then let’s add in the NgModule directive
@NgModule({
  imports: [BrowserAnimationsModule]
})
Adding the material theme
In src/styles.scss, let’s add
$fa-font-path : '../node_modules/@fortawesome/fontawesome-free/webfonts';
@import '../node_modules/@fortawesome/fontawesome-free/scss/fontawesome';
@import "~@angular/material/prebuilt-themes/indigo-pink.css";
Addition ofhammerjs
Add the call in src/main.ts
import 'hammerjs';Adding material icons
To do this, let’s modify the src/index.html file and add in the tag
<link href="https://fonts.googleapis.com/icon?family=Material+Icons" rel="stylesheet">Let’s create a login page
Thanks to Angular/cli, we can easily generate an application, a page, a service, a directive, an interface, a class…. And this with the command « ng g » or « ng generate« .
To keep the same convention, we create the login page in the src/app/components folder. Here is the command to create this page.
ng g component components/loginThis command does the following actions:
- Creates the file src/app/components/login/login.component.html
- Creates the file src/app/components/login/login.component.spec.ts
- Creates the file src/app/components/login/login.component.ts
- Creates file src/app/components/login/login.component.scss
- Add the component in src/app/app.module.ts
Let’s take a closer look at what was done in src/app/app.module.ts
The following line was added
import { LoginComponent } from './components/login/login.component';LoginComponent has been added in
@NgModule({
  declarations: [
    LoginComponent
  ]
})
Now that we have our page, how do we access it via the browser?
Well I’d like to type http://localhost:4200/#/login and see the login page angular created.
Well, when I do that, nothing happens… I’m redirected to the home page.
Let’s work around this by modifying the src/app/app-routing.module.ts file
Let’s add the import of the login component
import { LoginComponent } from './components/login/login.component';In routes, let’s add loginComponent like this
const routes: Routes = [
{
path: '',
component: HomeComponent
},
{
path: 'login',
component: LoginComponent
}
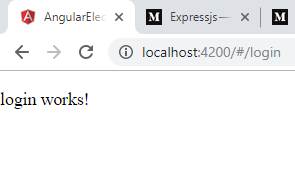
];Now let’s see the result of http://localhost:4200/#/login
Good work !
It is now in this page that we will create our login form.
Let’s modify the template src/app/components/login/login.component.html
<div fxLayout="row" fxLayoutAlign="center" class="login-main">
  <mat-card >
    <mat-card-header>
      <mat-card-title>{{ 'PAGES.login.header' | translate }}</mat-card-title>
    </mat-card-header>

    <mat-card-content fxLayout="column">
      <mat-form-field>
        <input matInput placeholder="{{ 'PAGES.login.email_placeholder' | translate }}">
      </mat-form-field>

      <mat-form-field>
        <input type="password" matInput placeholder="{{ 'PAGES.login.password_placeholder' | translate }}">
      </mat-form-field>
    </mat-card-content>

    <mat-card-actions align="end">
      <button mat-raised-button color="primary">{{ 'PAGES.login.button' | translate }}</button>
    </mat-card-actions>
  </mat-card>
</div>
Let’s add the material components in src/app/app.module.ts. We import flex-layout and the material components in src/app/app.module.ts.
import { FlexLayoutModule } from '@angular/flex-layout';
// Material
import {
  MatSidenavModule,
  MatToolbarModule,
  MatIconModule,
  MatCardModule,
  MatInputModule,
  MatFormFieldModule,
  MatButtonModule,
  MatListModule } from '@angular/material';
Ensuite, on ajoute dans
@NgModule({
// ...
  imports: [
    // Material
    MatSidenavModule,
    MatButtonModule,
    MatToolbarModule,
    MatIconModule,
    MatCardModule,
    MatListModule,
    MatInputModule,
    MatFormFieldModule,
    FlexLayoutModule
  ]
})
Let’s do a little layout. Let’s edit the file src/app/components/login/login.component.scss
.login-main {
  margin-top: 2em;
}

.mat-card {
  width: 60%;
}
Because we did it right and put the translation keys in the html template. Let’s go and fill out these translations in src/assets/i18n/en.json. We’ll get this:
{
  "PAGES": {
      "HOME": {
          "TITLE": "Welcome "
      },
      "login": {
        "header": "Login ",
        "email_placeholder": "Votre identifiant",
        "password_placeholder": "Votre mot de passe",
        "button": "Se connecter"
      }
  }
}
Let’s refresh the page now
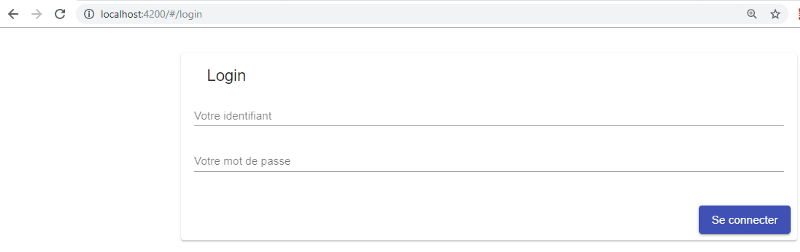
Et voilà.
Sources: https://github.com/rabehasy/angular-electron/tree/step1
Translated by A.A