Let’s continue the article on API REST with sequelize
In this article, we’ll add security to our application. There will be an /api/user/login url called in POST and allowing to connect thanks to the username/password pair. Once logged in, the information accessible only by a logged in user will be displayed. We will also add a url accessible only by a user with a role of “SUPER_ADMIN”.
We install useful packages.
npm i jsonwebtoken bcryptjs cors passport-jwt passport passport-local locutus --save- bcryptjs: used to hasher the password. It will check if the hash of the entered password matches the hash saved in the database.
- cors: (Cross Origin Resource Sharing) will add a header to the URL and allow an external url to correctly read the information on the URL called. This is one of the objectives of creating a rest API.
- passport-*: allows managing authentication. In our example, we will mainly use passport-jwt and passport-local. Indeed, there are as many possibilities offered by this library as facebook authentication, or google for example…
- locutus: is a javascript package that allows using all php functions in javascript. We will need this package to use the php unserialize function in particular to retrieve the role of the connected user.
Modify the file models/fos_user.js . It is the “model” that describes the table of our users.
At the beginning of the script
// Utile pour hasher le mot de passe
var bcrypt = require("bcryptjs");
Add this to the end of the function (sequelize, DataTypes)
User.prototype.validPassword = function(password) {
    return bcrypt.compareSync(password, this.password);
};

return User;
This validPassword function is used to compare the password hash entered by the user to the password of the same user saved in the database.
JWT (Json Web Tokens)
Let’s create the config/middleware/authenticate.js file and add this code
var jwt = require('jsonwebtoken');
var JwtStrategy = require('passport-jwt').Strategy;
var ExtractJwt = require('passport-jwt').ExtractJwt;

var passport = require('passport');

var db = require("../../models");
var unserializephp = require('locutus/php/var/unserialize');
Configuration jwt
var opts = {};
opts.jwtFromRequest = ExtractJwt.fromAuthHeaderAsBearerToken();
opts.secretOrKey = '12541302154877';
You can choose any string in secretOrKey. You just have to keep the same value when you use this property a little later.
exports.jwtPassport = passport.use(new JwtStrategy(opts, (jwt_payload, done) => {

    db.fos_user.findOne({
        where: {
            id: jwt_payload._id
        }
    }).then(
        (user) => {

            if (!user) {
                return done(null, false);
            }

            return done(null, user);
        });

}));
verifyUser
The following verifyUser function will let you know if a user is logged in or not. It will use the jwt-passport to determine this.
exports.verifyUser = passport.authenticate('jwt', {session: false});getToken
The following getToken function will retrieve the given token when the connection is successful. This is where you have to be careful that the value is identical to the secretOrKey property defined above.
expiresIn: 3,600 indicates that the connection is valid for 3,600 seconds -that is, 1 hour. After 1 hour, you will need to request a new token (so login again) in order to be authenticated.
exports.getToken = function (user) {
    return jwt.sign(user, '12541302154877', {
        expiresIn: 3600
    });
};
verifyAdmin
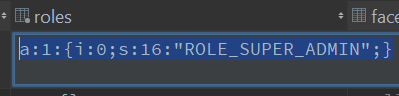
This function will be used to detect if the logged in user has a ROLE_SUPER_ADMIN role. Example case: only the user with this role will have the right to delete an entry in the database. It is in this function that unserialize will be used. This will be the case only for our example. Indeed, the role is a field containing a serialized data as below.
So, it’s up to us to adapt our code to our own needs …
exports.verifyAdmin = (req, res, next) => {

    let roles = unserializephp(req.user.roles);

    let i = 0;
    if (roles) {
        roles.forEach((role) => {
            if (['ROLE_SUPER_ADMIN'].includes(role)) {
                i++;
            }
        })
    }

    if (i === 0) {
        return res.json({
            error: true,
            message: "You are not admin",
            roles: role
        });
    }

    next();
};
Complete code : https://github.com/rabehasy/nodejs-express/blob/step3/config/middleware/authenticate.js
Route to the login page
Now let’s move on to more visible and concrete things.
Modify/app.js. Add the controller responsible for the “route”
var apiUserRestRouter = require('./routes/rest/user');Then the URL that will be called to establish connections and retrieve user information.
app.use('/api/user', apiUserRestRouter);Let’s first create the/config/passport.js file and add the following information.
var passport = require("passport");
var LocalStrategy = require("passport-local").Strategy;

var db = require("../models");

passport.use(new LocalStrategy(
    (username, password, done) => {
        db.fos_user.findOne({
            where: {
                username: username
            }
        }).then(
            (user) => {

                if (!user) {
                    return done(null, false, { message: 'Incorrect username.' });
                }

                if (!user.validPassword(password)) {
                    return done(null, false, { message: 'Incorrect password.' });
                }

                return done(null, user);
            });
    }
));

passport.serializeUser(function(user, cb) {
    cb(null, user);
});

passport.deserializeUser(function(obj, cb) {
    cb(null, obj);
});

module.exports = passport;
Then create the/routes/rest/user.js file
var express = require('express');

var authenticate = require('../../config/middleware/authenticate')
var passport = require('../../config/passport')

const db = require('../../models');

var router = express.Router();
Login
This is an url called in POST. It asks in the parameter the username and password fields as defined in /config/passport.js
new LocalStrategy(
    (username, password, done) => {
/**
 * @POST /api/user/login
 */
router.post('/login', function(req, res, next) {
    passport.authenticate('local', {session: false}, (err, user, info) => {
        // console.log(user);
        if (err || !user) {
            return res.status(400).json({
                message: 'Something is not right',
                user   : user
            });
        }
        req.login(user, {session: false}, (err) => {
            if (err) {
                res.send(err);
            }

            var token = authenticate.getToken({_id: user.id});
            res.statusCode = 200;
            res.setHeader('Content-Type', 'application/json');
            res.json({
                success: true,
                token: token,
                status: 'You are successfully logged in'
            })

        });
    })(req, res);
});
We call this url in Postman in this way
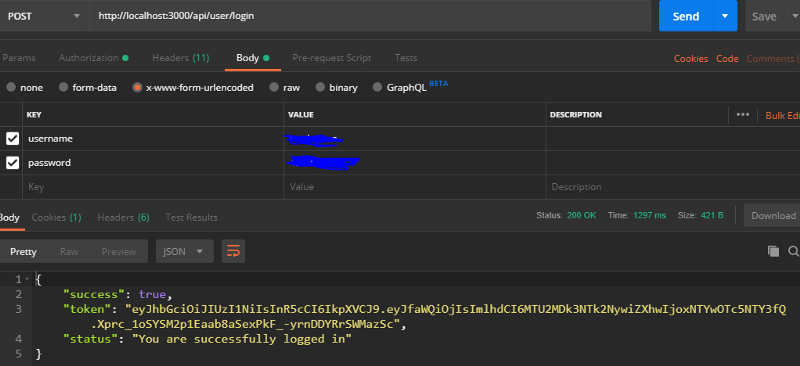
The JSON token return means that the connection is successful.
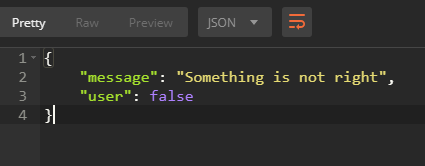
If we had put in a wrong password or username. We would have the following return:
We’ll use the token to retrieve the information accessible only as a logged in user.
Restrict access to a URL like this
/**
* @GET /api/user/me
*/
router.get('/me',authenticate.verifyUser, function(req, res, next) {
res.json({
error: false,
data: req.user
});
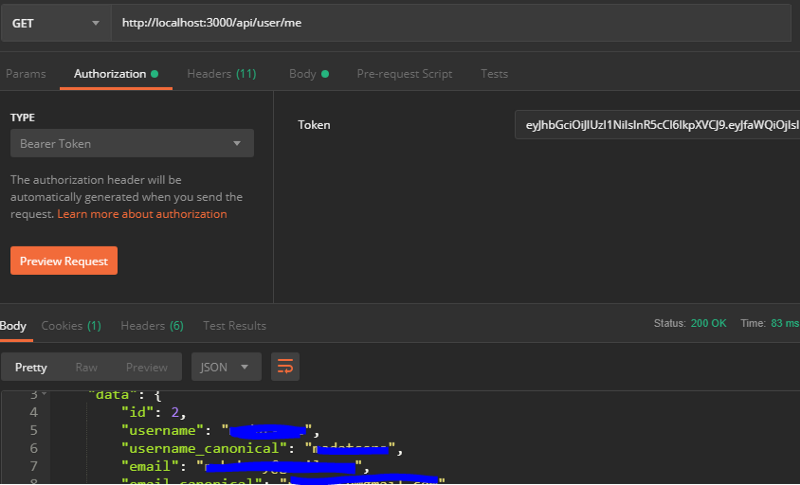
});Using the 2nd authenticate.verifyUser argument that we set in/config/middleware/authenticate.js. Access to the URL http://localhost:3000/api/user/me may be restricted
Let’s do this then
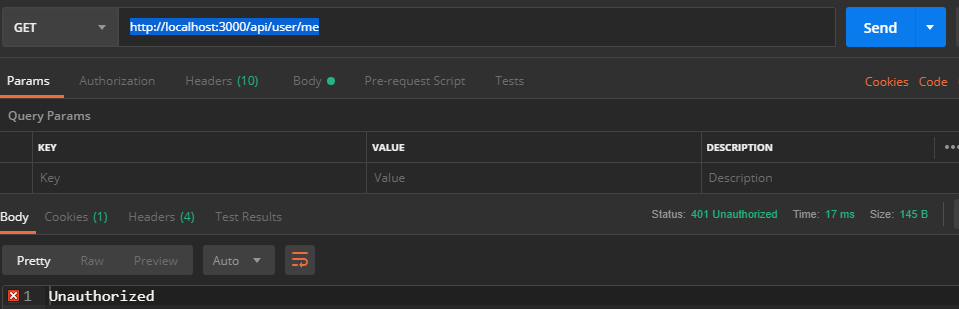
Oops, we end up with “Unauthorized”. Simply because at no point in the call did we pass the given token when we logged in.
Adjust this in Postman. Go to Authorization, then TYPE and choose Bearer Token. The value of the token is pasted into the text field on the right.
This time it’s good
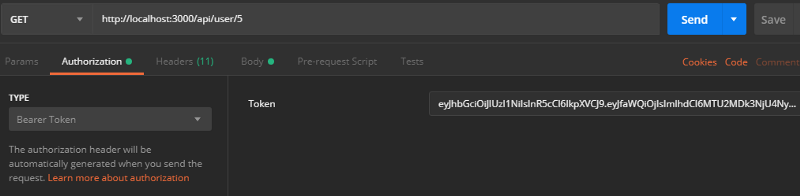
SUPER_ADMIN
We will retrieve the information of a user with a username. To do this, we have to be the “SUPER_ADMIN”. Add the authenticate.verifyAdmin restriction.
/**
 * @GET /api/user/1
 */
router.get('/:id', authenticate.verifyUser, authenticate.verifyAdmin, function(req, res, next) {
    const userId = req.params.id;
    db.fos_user.findOne({ where: { id: userId } }).then(api => res.json({
        error: false,
        data: api
    }));
});
And we can easily retrieve information from a user like this
Source code: https://github.com/rabehasy/nodejs-express/blob/step3/routes/rest/user.js
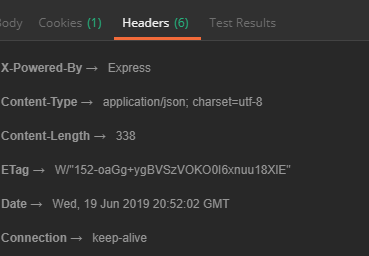
CORS
Let’s observe a header of a URL without CORS
Example: GET http://localhost:3000/api/api
Modify now /app.js
Add
var cors = require('cors');Then
// Cors
app.use(cors());
In this way, the cors will be applied for all URLS.
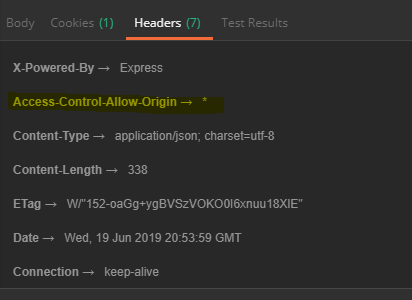
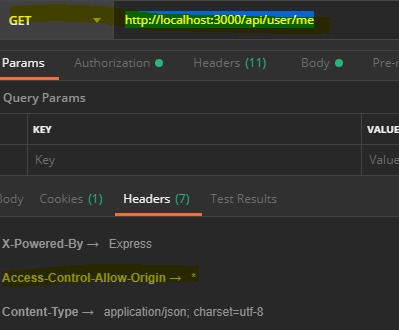
Refresh the same URL and observe the addition of
**Access-Control-Allow-Origin →***
Which proves that CORS is taken into account for this URL
If we wanted to add the cors only for a specific URL, we would have put
app.use(cors({
    origin: 'https://monsupersite.com'
}));
It gives
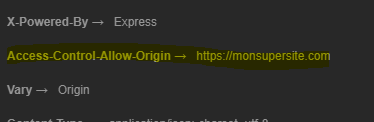
An application external to https://mysupersite.com that is trying to call a URL in ours would get an error message.
It’s also possible to add the cors for a specific URL, example http://localhost:3000/api/user/me . To do this, let’s modify/routes/rest/user.js
Let’s add.
var cors = require('cors');Then let’s modify the call
router.get('/me',authenticate.verifyUser, cors(),  function(req, res, next) {
    res.json({
        error: false,
        data: req.user
    });
});
Sources code : https://github.com/rabehasy/nodejs-express/tree/step3
Thanks to A.A for translating
this post ispublished on Medium too