
This article is the continuation of a first article on the creation of a web application in nodejs thanks to the express-generator package. This time, our goal is to add a MySQL connection in order to retrieve information from a database and display this information in the application as a simple list.
MySQL will be used as a database. To do this, we will use an ORM (Object Relational Mapping). There are several ORM nodejs such as: sequelize, typeORM and Mongoose. The ORM most suitable in our case is sequelize. Sequelize allows the use of a database type: MySQL, postgres, SQLite and Microsoft SQL Server.
We will also add other useful nodejs packages such as: sequelize-auto, sequelize-cli (which are sequelize addons), mysql2 and mysql.
- mysql and mysql2 are 2 libraries required to be used with sequelize and sequelize-auto. sequelize needs mysql2 to function properly and sequelize-auto needs mysql.
We install these packages by typing this into a console.
npm install sequelize sequelize-auto sequelize-cli mysql mysql2 --saveAs sequelize-cli and sequelize-auto will be installed in the same application folder, we will use npx: ( a utility that allows to execute binaries from npm packages).
Run
npx sequelize-cli initThis command creates 4 folders:
- models
- the models/index.js file
- config
- the config/config.json file
- migrations
- seeders
Modify the config/config.json file and fill in the information in our BDD
{
  "development": {
    "username": "root",
    "password": "*****",
    "database": "dbname",
    "host": "localhost",
    "dialect": "mysql",
    "operatorsAliases": false
  },
  "test": {
    "username": "root",
    "password": "*****",
    "database": "dbname_dev",
    "host": "localhost",
    "dialect": "mysql",
    "operatorsAliases": false
  },
  "production": {
    "username": "root",
    "password": "*****",
    "database": "dbname_prod",
    "host": "localhost",
    "dialect": "mysql",
    "operatorsAliases": false
  }
}
In our example, sequelize will use the login information contained in “development”. This can be determined by the following line in the file models/index.js
const env = process.env.NODE_ENV || 'development';
const config = require(__dirname + '/../config/config.json')[env];
Let’s use the following command to create a new model.
npx sequelize-cli model:generate - name User - attributes firstName:string,lastName:string,email:stringAs stated above, thanks to the sequelize-auto package, we will be able to automatically generate our models from existing tables, which is our case, because we already have a database ready.
npx sequelize-auto -o "./models" -d dbname -h localhost -u root -p 3306 -x motdepasse -e mysqlData Recovery
Modify bin/www file. Add
var models = require('../models');Then
models.sequelize.sync().then(function() {
    /**
     * Listen on provided port, on all network interfaces.
     */
    server.listen(port, function() {
        debug('Express server listening on port ' + server.address().port);
    });
    server.on('error', onError);
    server.on('listening', onListening);
});
to automatically synchronize models to the database.
View info in routes/users.js
Let’s modify the file routes/users.js and add
const db = require('../models');Then in the block
router.get('/', function(req, res, next) {
db.api.findAll({ limit: 10 }).then(function(rows) {
res.render('user', { rows: rows });
});
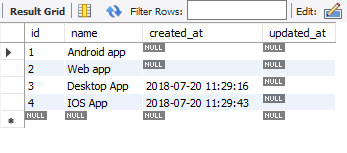
});In the example above — api is the name of the model models/api.js that looks like this
module.exports = function(sequelize, DataTypes) {
  return sequelize.define('api', {
    id: {
      type: DataTypes.INTEGER(11),
      allowNull: false,
      primaryKey: true,
      autoIncrement: true
    },
    name: {
      type: DataTypes.STRING(255),
      allowNull: false
    },
    created_at: {
      type: DataTypes.DATE,
      allowNull: true
    },
    updated_at: {
      type: DataTypes.DATE,
      allowNull: true
    }
  }, {
    tableName: 'api',
    underscored: true
  });
};
Here is an overview of the api table
Template handlebars
So let’s change views/user.hbs like this
{{#each rows}}
<div class="border-bottom__1px_solid_black">
<h2>{{name}}</h2>
{{{created_at}}}
</div>
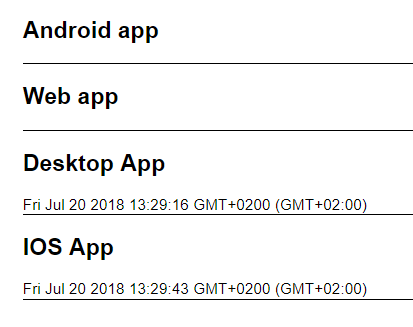
{{/each}}which simply displays a loop “#each” : name and created_at are fields in the api table.
Then we go on the url http://localhost:3000/users and we should have this as a result
Sources: https://github.com/rabehasy/nodejs-express/tree/step1
Thanks to A.A for translating.
This post is published on Medium